

Screen printing is your best bet for bulk cotton tote orders of 250 or more with simple logos, while DTF (direct-to-film) wins for small runs on dark or mixed-fabric bags, and dye sublimation is the only reliable choice for edge-to-edge photographic prints on polyester. For one-offs or personalized gifts, heat transfer vinyl (HTV) gets the job done with minimal setup.
Here are three rules you can apply right now:
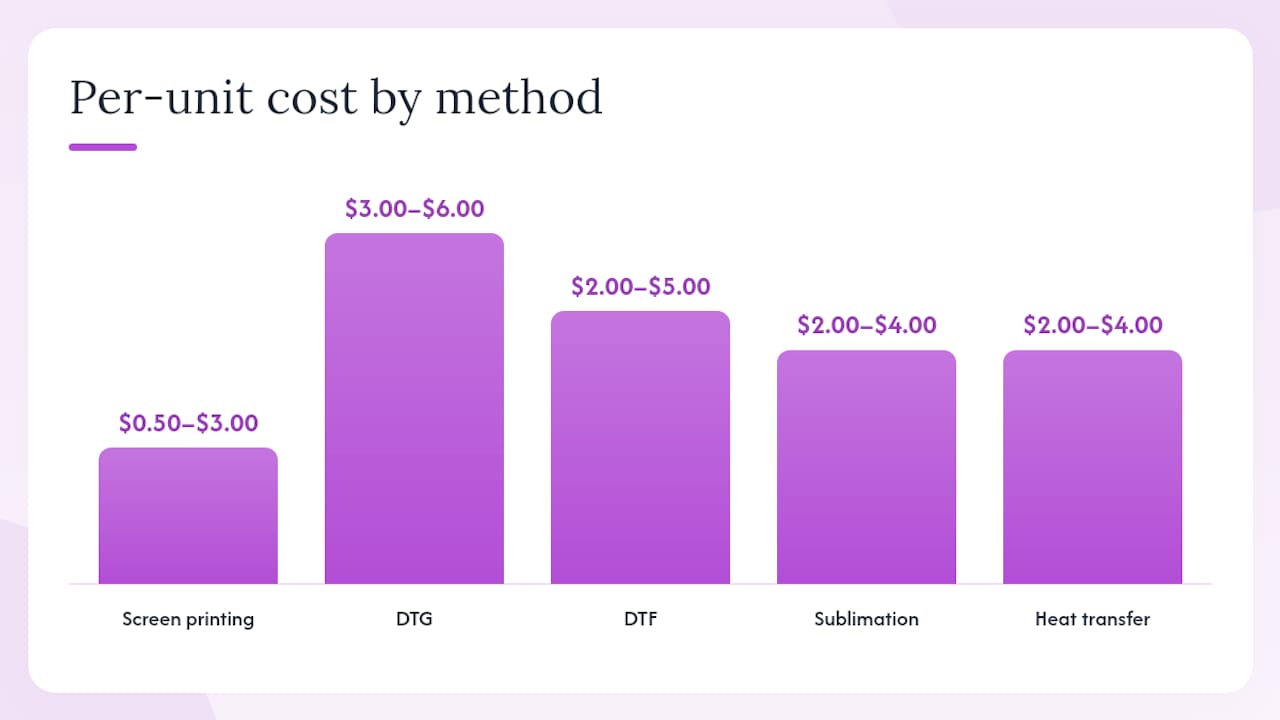
- Order 250+ bags with a 1–6 color logo? Screen printing gives you the lowest per-unit cost, typically $0.50–$3.00 depending on color count, according to tote bag printing method comparisons.
- Need a photo-quality print on 1–50 cotton bags? DTG (direct-to-garment) or DTF handles full color with no minimums.
- Printing on polyester for an all-over design? Dye sublimation is the only method that permanently bonds ink to polyester fibers.
Shaysprintshop handles custom tote bag orders across multiple methods, so you can match your bag material and quantity to the right technique without guessing.
Key Takeaways
Matching your bag material to the right printing method is the single most important decision in any custom tote order.
| Point | Details |
|---|---|
| Screen printing for bulk orders | Best per-unit cost ($0.50–$3.00) for 250+ bags with 1–6 spot colors on cotton or jute. |
| DTF for small runs and dark bags | Works on nearly any fabric with no minimums and full-color output for $2.00–$5.00 per unit. |
| Sublimation requires polyester | Only works on polyester or polymer-coated substrates; produces permanent, edge-to-edge prints. |
| Always request a physical sample | A wash test on one bag before full production prevents the most costly reprinting mistakes. |
| Shaysprintshop for quotes | Shaysprintshop offers custom tote printing with bulk pricing, fast turnaround, and file prep help. |
Table of Contents
- How do the main tote bag printing methods compare?
- Why screen printing still dominates for bulk cotton tote orders
- What DTG printing does best on tote bags (and where it falls short)
- DTF transfers: the flexible option for dark bags and mixed fabrics
- Dye sublimation: the only method for all-over polyester prints
- Heat transfer and HTV: fast personalization with trade-offs
- Embroidery and digital UV printing: when specialty finishes make sense
- How do you pick the right printing method for your tote order?
- What file formats and color settings do printers actually need?
- What proofs and quality checks should you request before full production?
- DIY and small-batch printing: what you can realistically do at home
- Real-world pricing and turnaround at Shaysprintshop
- What small businesses actually get wrong when choosing a printing method
- Shaysprintshop makes custom tote printing straightforward
- Sources
How do the main tote bag printing methods compare?
The table below maps each method across the decision dimensions that matter most: material fit, color range, durability, cost, and turnaround. Use it to narrow your options before diving into the details.
| Method | Best for | Compatible materials | Color capability | Durability/washability | Print feel | Setup cost | Per-unit cost | MOQ | Turnaround | Design prep |
|---|---|---|---|---|---|---|---|---|---|---|
| Screen printing | Bulk, simple logos | Cotton canvas, jute, non-woven PP | 1–6 spot colors | Excellent | Slightly raised | $30–$50/screen | $0.50–$3.00 | 250–500 | 5–10 days | Color separations needed |
| DTG | Small runs, photo prints | Cotton canvas (light preferred) | Unlimited | Good (fades faster on dark) | Soft | None | $3.00–$6.00 | 1 | 1–5 days | Raster file, 300 DPI |
| DTF | Mixed fabrics, dark bags, small-medium runs | Cotton, polyester blends, synthetics | Unlimited | Very good | Slight texture | Low (film/powder) | $2.00–$5.00 | 1–25 | 1–5 days | Raster or vector |
| Sublimation | All-over polyester prints | Polyester, polymer-coated only | Unlimited | Excellent (permanent) | Smooth, no feel | Low | $2.00–$4.00 | 25+ | 5–10 days | High-res raster |
| Heat transfer/HTV | Personalization, one-offs | Most fabrics | Limited (cut vinyl) / full color (digital transfer) | Fair (peel risk) | Raised/vinyl feel | Minimal | $2.00–$4.00 | 1 | 1–3 days | Vector for HTV |
| Embroidery | Premium logos, corporate gifts | Cotton canvas, jute, woven fabrics | Thread colors (limited palette) | Excellent | Raised, textured | $20–$50 digitizing | $5.00–$15.00+ | 12–24 | 5–10 days | Vector, simplified art |
| Digital UV | Heat-sensitive bags (PVC, clear vinyl) | PVC, clear stadium bags, vinyl | Full color | Good (flexible inks) | Smooth | Low | $3.00–$8.00 | 1–12 | 1–5 days | High-res raster |
Why screen printing still dominates for bulk cotton tote orders
Screen printing pushes ink through a mesh stencil onto the bag surface, one color at a time. Plastisol inks are the industry standard for opacity and durability; water-based inks are softer to the touch and more eco-friendly, though they require more precise curing.
Cotton canvas, jute, and non-woven polypropylene (PP) are the best materials for screen printing because their flat, absorbent surfaces hold ink cleanly. Textured or stretchy fabrics cause registration problems.
Setup runs $30–$50 per screen (one screen per color), and per-unit costs drop sharply at volume. Bulk screen printing analysis shows that rotary screen processes change the cost curve at high volumes, making industrial runs significantly cheaper per unit than manual table-screen setups. That’s why screen printing is the dominant method for factory-scale tote production.
Pros and cons at a glance:
- ✅ Lowest per-unit cost at 250+ units
- ✅ Vibrant, long-lasting colors on cotton and jute
- ✅ Excellent wash durability with plastisol inks
- ❌ Setup cost makes small runs expensive
- ❌ Photographic or gradient designs require costly separations
- ❌ Each color adds a screen fee
Common defects and how to prevent them: Misregistration (colors slightly out of alignment) happens when bags shift between screens. Ask your printer about registration clamps or jigs. Ink bleed occurs when ink is too thin or the mesh count is too low for fine detail. Request a strike-off proof before full production.
What DTG printing does best on tote bags (and where it falls short)
DTG works like a high-precision inkjet printer aimed directly at fabric. The machine sprays water-based inks into the fibers, producing photo-realistic prints with no color limits. On dark bags, a white underbase layer is printed first, which adds cost and slightly affects the soft-hand feel.
Cotton canvas is the ideal DTG substrate. Polyester and textured weaves absorb ink unevenly, producing dull or patchy results. Light-colored bags also produce sharper, more vibrant output than dark ones because the underbase layer on dark fabric can look slightly chalky after washing.
Per-unit costs run $3.00–$6.00, which is higher than screen printing at volume but competitive for runs under 50 pieces where screen setup fees would dominate the total cost. Printing method cost comparisons confirm DTG has no minimum order requirement, making it the go-to for one-off samples or variable designs (each bag printed differently).
For file prep, submit a 300 DPI raster file (PNG or TIFF with a transparent background). Vector files can work but must be rasterized before printing. Wash durability is good but slightly lower than screen printing, especially on dark bags where the underbase can crack over many wash cycles.
When to choose DTG over DTF or screen: Pick DTG when you need photo-quality prints on light cotton bags in quantities under 100, and when you want a soft hand feel without the slight texture of a DTF transfer.
DTF transfers: the flexible option for dark bags and mixed fabrics
DTF (direct-to-film) is a transfer process, not a direct-to-fabric method. The design is printed onto a clear PET film using water-based inks, then coated with adhesive powder and cured. A heat press bonds the finished transfer to the bag. This two-step workflow means you can pre-print transfers in batches and apply them on demand.
The material compatibility advantage is real. DTF workflow and material guidance confirms DTF works on cotton, polyester blends, and many synthetics where DTG struggles. Dark bags are no problem because the white ink layer is built into the transfer film, not applied separately on the bag.
DTF quick-reference:
- ✅ Works on nearly any fabric, including dark and synthetic bags
- ✅ Full-color prints with no color-count surcharge
- ✅ Flexible MOQ (as low as 1 piece)
- ✅ Competitive per-unit cost for multi-color work ($2.00–$5.00)
- ❌ Slight rubbery texture compared to DTG or screen printing
- ❌ Edges can peel if heat settings are incorrect during application
- ❌ Not ideal for very large all-over prints (film size limits apply)
For small-batch runs of 25–150 bags with complex, full-color artwork on dark or mixed-material bags, DTF often beats both DTG (on cost) and screen printing (on setup flexibility). Heat settings matter: too low and the transfer won’t bond; too high and synthetic fabrics can distort. Always test on a swatch first.
Dye sublimation: the only method for all-over polyester prints
Sublimation works by converting solid dye into gas under heat and pressure, which permanently bonds into polyester fibers. The result is a print that is part of the fabric itself, with no raised texture and no risk of peeling or cracking. Edge-to-edge, photographic-quality coverage is possible because the dye migrates into every fiber it contacts.
The catch is absolute: sublimation only works on polyester or polymer-coated substrates. Cotton tote bags will produce faded, washed-out results because cotton fibers don’t accept sublimation dye. White or very light-colored bags are also required, since the dye is transparent and relies on the fabric’s base color.
Per-unit costs run $2.00–$4.00 with typical MOQs starting around 25 pieces, as sublimation cost and compatibility data shows. Turnaround is usually 5–10 days. Wash durability is excellent because the dye is embedded in the fiber, not sitting on top of it.
If you’re ordering woven polypropylene (PP) bags for trade shows or retail and want full-bleed photographic prints, sublimation is the right call. For cotton canvas event totes, it’s the wrong tool entirely.
Heat transfer and HTV: fast personalization with trade-offs
Heat transfer vinyl (HTV) and digital heat transfers are two different things that often get grouped together. HTV involves cutting a design from colored vinyl sheets and pressing the cut pieces onto the bag. Digital heat transfers print a full-color image onto transfer paper that is then heat-pressed onto the fabric. Both use a heat press, but the output and durability differ.
HTV is the most accessible DIY method. A basic heat press and a vinyl cutter are the only equipment you need, and MOQ is effectively 1 piece. Per-unit material costs are low, but the vinyl feel is noticeable and edges can crack or peel after repeated washing, especially if the bag is washed inside out or on high heat.
Care tips to extend HTV life:
- Wash inside out in cold water
- Avoid high-heat dryer cycles
- Never iron directly over the vinyl
- Re-press peeling edges with a heat press or household iron and parchment paper
Digital heat transfers offer more color complexity than HTV but share the same durability limitations. For personalized gifts, small event runs, or one-off branded bags, both methods are practical. For anything over 100 units where durability matters, DTF or screen printing is a better investment.
Embroidery and digital UV printing: when specialty finishes make sense
Embroidery for premium tote decoration
Embroidery stitches thread directly into the fabric, creating a raised, textured decoration that looks and feels premium. It’s the preferred method for corporate gifts, high-end retail totes, and logo work where tactile quality signals brand value.
Cotton canvas and jute handle embroidery well because their weave structure supports the needle without distortion. Thin or loosely woven bags can pucker. Digitizing (converting your artwork into a stitch file) costs $20–$50 as a one-time setup fee, and per-unit costs typically run $5.00–$15.00 or more depending on stitch count. MOQs usually start at 12–24 pieces.
The key limitation is design complexity. Photographic detail, gradients, and fine text don’t translate well into thread. Simplified logos with clean lines and limited colors work best. Cotton canvas decoration guidance from Q-Tees confirms embroidery excels for premium texture on canvas totes, while ink-based methods handle detail and volume better.
Digital UV printing for heat-sensitive bags
Digital UV printing uses specialty UV-curable inks that harden instantly under UV light, eliminating the heat exposure that can melt or distort PVC and clear vinyl bags. UV printing capabilities for tote substrates explain how flexible UV inks (such as xFlexx formulations) produce durable, full-color prints on materials that traditional heat-transfer methods can’t handle. Clear stadium bags, PVC totes, and vinyl-coated substrates are the primary use cases. Per-unit costs run $3.00–$8.00, with very low MOQs and fast turnaround of 1–5 days.
How do you pick the right printing method for your tote order?
Work through these steps in order before contacting a printer:
- Confirm your bag material. Cotton canvas opens up screen printing, DTG, DTF, HTV, and embroidery. Polyester points to sublimation or DTF. PVC or clear vinyl requires digital UV.
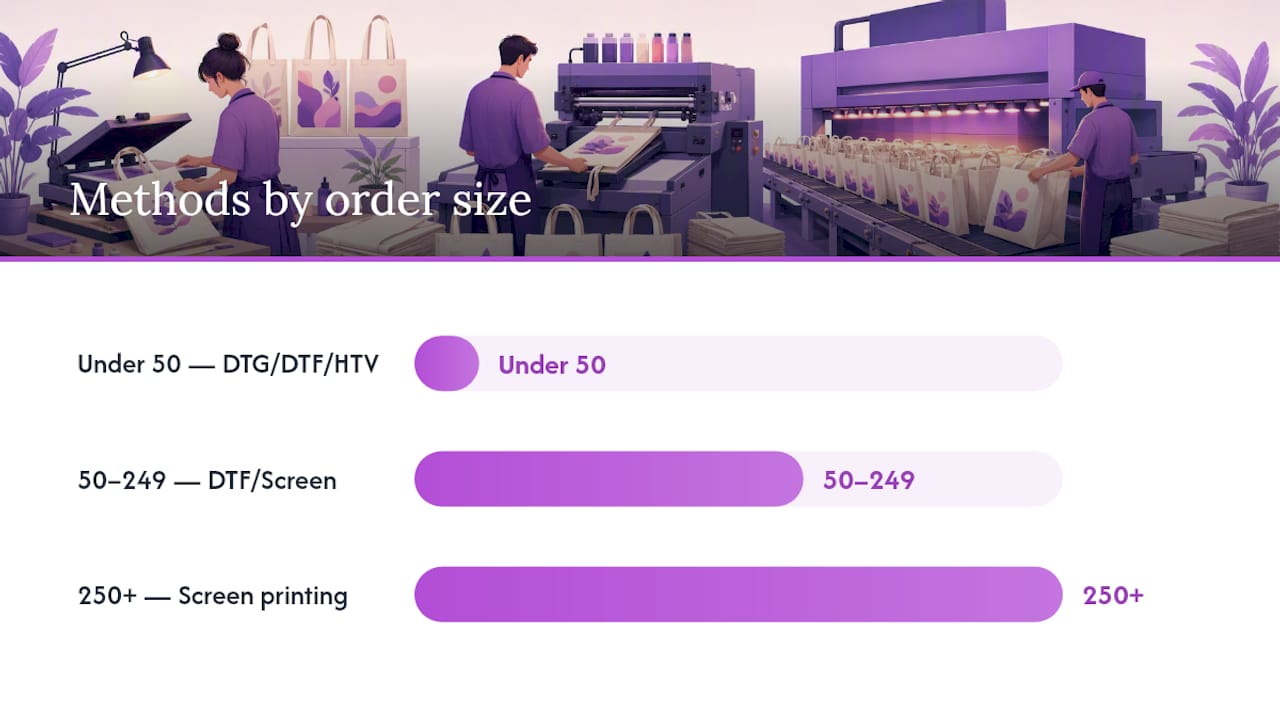
- Set your quantity. Under 50 bags: DTG, DTF, or HTV. 50–249 bags: DTF or screen printing (if design is simple). 250+ bags: screen printing for the best per-unit cost.
- Assess your artwork. Photographic or full-color gradient: DTG, DTF, or sublimation. Simple logo in 1–4 colors: screen printing or HTV. Premium tactile logo: embroidery.
- Define your durability need. Promotional giveaway bags: any method works. Retail product or daily-use bags: screen printing, sublimation, or embroidery for longevity.
- Check your timeline. Need bags in 3 days? HTV or DTF. Need 500 bags in 2 weeks? Screen printing with a confirmed proof.
Questions to ask your printer before placing an order:
- What file format and resolution do you require?
- Do you offer a pre-production sample or strike-off proof?
- What are your wash-test results for this method on this bag material?
- What is the exact turnaround from proof approval to shipping?
- Are there color-matching guarantees (Pantone or CMYK)?
Red flags to watch: No sample option, vague MOQ language, no wash-test data, and turnaround promises that don’t account for proof approval time.
Pro Tip: For simple text or logo prints, industry experts note that the average customer often can’t distinguish between screen printing, DTF, and HTV on a finished bag. Let your workflow, timeline, and material drive the decision, not just the print method’s reputation.
What file formats and color settings do printers actually need?
Getting your files right before submitting saves days of back-and-forth. Here’s what most printers expect:
File format checklist:
- Vector files (AI, EPS, PDF) for logos, text, and HTV designs. Vectors scale without quality loss.
- Raster files (PNG, TIFF) at 300 DPI minimum for DTG and DTF. Lower resolution produces pixelated prints.
- Transparent backgrounds on PNG files so the printer doesn’t have to manually remove white fill.
Color management:
- Convert files to CMYK before submitting for DTG, DTF, and sublimation. RGB files can shift color significantly when converted by the printer’s software.
- Embed ICC profiles when your printer specifies one.
- For screen printing, request Pantone (PMS) color matching if brand color accuracy matters. Each Pantone color becomes a separate screen.
White underbase and dark bags: DTG on dark bags requires a white underbase layer. Ask your printer to show you a proof with the underbase included, not just a digital mockup on a white background.
Layout rules: Keep critical design elements at least 0.5 inches from bag seams and strap attachment points. Maximum printable area on a standard 13"x15" cotton tote is typically 10"x12". Ask for the printer’s specific template.
Proofing: Always approve a digital proof before production. For orders over 100 units, request a physical pre-production sample.
What proofs and quality checks should you request before full production?
Catching a problem on one sample bag costs almost nothing. Catching it after 300 bags are printed is expensive.
Proof types and what each verifies:
- Digital proof: Confirms layout, color approximation, and placement. Does not verify actual ink color on fabric.
- Color proof (strike-off): A physical print on the actual bag material. Verifies true color output, registration, and underbase visibility.
- Pre-production sample: A fully finished bag produced exactly as the full run will be. The gold standard before large orders.
- Wash test: The sample is washed 5–10 times and inspected for fading, cracking, or peeling. Critical for any method where durability is a selling point.
QC checklist to request from your printer:
- Color match to approved proof (within acceptable tolerance)
- Registration accuracy (no color misalignment)
- Adhesion test (no peeling or lifting at edges)
- Wash and dry test results
- Seam interference check (design doesn’t run into stitching)
Testing each bag material before full production is non-negotiable for heat-based methods. Field-tested production advice consistently flags heat tests on synthetic and non-woven bags as a critical step, because high heat can melt or distort those substrates permanently.
Sample request template (adapt as needed):
DIY and small-batch printing: what you can realistically do at home
DIY tote printing is practical for small quantities, but the equipment list and material risks are real.
Common DIY methods and what you need:
- Iron-on transfers: A household iron, transfer paper, and a printer. Works on cotton. Results are acceptable for personal use but peel faster than professional heat-press applications.
- Heat press + HTV: A 15"x15" heat press ($150–$400) and a vinyl cutter ($200–$400). Produces clean, durable results on cotton. Requires learning curve for weeding and pressing.
- Home screen-print kits: A photo emulsion kit, mesh frames, squeegee, and plastisol or water-based inks. Setup takes time and practice. Best for flat, simple designs on cotton.
Material cautions: Always test heat settings on a swatch of the actual bag before pressing a full order. Non-woven PP bags and synthetic blends can melt, shrink, or discolor at standard HTV temperatures (around 305°F). Cotton canvas handles heat well; polyester requires lower temperatures.
When to hire a pro instead: If you need more than 25 bags, consistent brand colors, or a design with fine detail, professional production is almost always cheaper per unit and produces better results. The time cost of DIY at volume adds up fast, and color consistency across a large batch is difficult without commercial equipment.
Real-world pricing and turnaround at Shaysprintshop
Shaysprintshop’s custom tote bag services offer a practical reference point for small U.S. businesses planning a tote order.
| Scenario | Method | Typical turnaround | Notes |
|---|---|---|---|
| 10–50 personalized cotton totes | DTF | 1–5 days | No minimum; full color; works on dark bags |
| 50–250 branded event totes | DTF or screen printing | 5–10 days | Screen printing more cost-effective at higher end of range |
| 250+ logo totes, 1–4 colors | Screen printing | 5–10 days | Lowest per-unit cost; approve proof quickly to protect timeline |
| Custom apparel bundle (totes + shirts) | DTF | 5–10 business days | Bundle pricing available; reference packages offered |
Shop tips to reduce cost and speed turnaround:
- Consolidate your design to fewer colors when using screen printing. Each additional color adds a screen fee.
- Approve your digital proof within 24 hours of receiving it. Proof delays are the most common reason orders miss deadlines.
- Request a physical sample for orders over 100 units before approving full production.
What small businesses actually get wrong when choosing a printing method
Most small businesses overthink the method and underthink the material. The printing technique matters, but the bag substrate is what determines which methods are even on the table. A cotton canvas tote and a non-woven PP bag are not interchangeable, and treating them as such leads to wasted samples and reprints.
The second common mistake is choosing a method based on per-unit cost alone without factoring in setup fees. Screen printing at $0.50 per unit sounds great until you add $150 in screen fees for a 3-color design on a 50-unit order. DTF at $3.00 per unit with no setup cost is cheaper for that same run.
The third mistake is skipping the sample. A digital mockup on a white background tells you almost nothing about how a print will actually look on a dark canvas bag with a textured weave. Request a physical strike-off, run a wash test, and only then approve full production. That one step eliminates the most expensive printing mistakes.
Shaysprintshop makes custom tote printing straightforward
You’ve got the method knowledge. Now you need a shop that can execute it cleanly, on time, and at a price that makes sense for your order size. Shaysprintshop specializes in custom tote printing with fast turnaround, bulk-friendly pricing, and file prep support so you’re not stuck troubleshooting color modes or resolution issues on your own.
Tell Shaysprintshop your bag material, quantity, and design, and you’ll get a clear quote with no guesswork. Whether you need 10 personalized cotton totes for a family event or 300 branded bags for a corporate giveaway, the shop handles both ends of the range. Browse custom tote bag options or reach out directly to start your order.
Sources
- Tote Bag Printing Methods: Complete Comparison Guide
- Printing Tote Bags: Best Methods and Materials
- Q-Tees Shares Expert Guide to Choosing the Right Decoration Method for Cotton Canvas Totes | Impressions
- Best Print Methods for Cotton Cloth Tote Bags in Bulk
0 comments